


Is landscape mode really useful ? What you need to know
When you take out your camera to capture a beautiful view, the reflex is often the same: activate landscape mode. This automatic setting, which is available on most compact cameras and bridge cameras, as well as smartphones, makes a promise. It enhances wide scenes without having to touch the settings.
But does it always perform as well as it claims to? Is it really enough to get great shots? And above all, what happens when you want to go a step further, customise your shot or compose it differently?
Through concrete examples and practical advice, you'll discover how to take back control of your images, whatever your level.
What is the ‘landscape’ mode for?
When you're new to photography, automatic modes are reassuring. The ‘landscape’ mode is one of them. It is designed to simplify outdoor shooting when you want to capture a wide scene with lots of detail in the image. But what does it really do? And when is it actually suitable?
Definition of landscape mode on a camera
Landscape mode is an automatic preset. It is available on most cameras, whether compact, bridge or hybrid. It is often activated via a small icon representing a mountain.
Its purpose is very simple: to produce a sharp image from the foreground to the background, with colours that stand out well. It is designed for photographing still scenes in broad daylight with natural lighting.
What landscape mode does automatically
When you select landscape mode, the camera makes several adjustments for you. It favours a small aperture (large depth of field) so that the entire scene is sharp.
The focus is often set to infinity, which helps keep distant objects in sharp focus. Colour processing is sometimes enhanced. Greens, blues, and contrasts can be boosted to enhance the visual aspect of the landscape.
The camera also uses a medium to fast shutter speed, especially if the light is good. This prevents motion blur, but it can limit creativity.
To better understand certain terms such as aperture, shutter speed and ISO, you can read our article: Understanding aperture, shutter speed and ISO: the magic trio for successful photography
For which scenes is landscape mode useful?
This automatic mode gives good results in typical conditions. A clear view, a clear sky, a static scene—that's where it's most comfortable.
It works well for mountain landscapes, seasides, fields, or cities seen from afar. It can also be used to photograph monuments or buildings while retaining all the details.
If the light is even and the subject is stable, this mode does its job. It avoids missing the shot by focusing on the essentials.
The limitations of landscape mode
But landscape mode also has its limitations. By entrusting all the settings to the camera, you lose freedom. It becomes difficult to play with background blur, adjust exposure, or choose a specific point on which to focus.
This mode is not always suitable in cases of backlighting, low light, or moving subjects. The image may lack depth or be poorly exposed if conditions are not ideal.
For those who want to improve their photography skills, it is therefore useful to understand what this mode does... so you know when to avoid using it.
Why is landscape mode not always sufficient?
Automatic modes are very useful, especially when you're just starting out. They save time and avoid complex settings. But like any automatic system, landscape mode also has its weaknesses. Knowing how to spot them is the first step to improving.
Depth of field, light, details: the pitfalls of fully automatic mode
Landscape mode assumes that you want a photo that is sharp throughout, from the foreground to the horizon. To achieve this, as mentioned above, the camera selects a small aperture. However, this aperture lets in less light. If the sky is overcast or the scene lacks contrast, the image may appear dull or underexposed.
This mode also prevents intentional blurring effects. You can't really separate a subject from the background or create a more artistic atmosphere. The camera imposes a single interpretation of the scene. However, in photography, and particularly in landscape photography, it is often interesting to leave room for subjectivity.
Specific cases where landscape mode does not give the best results
Let's take a few examples. In backlighting, the camera will tend to balance the light, but you will lose the details of the sky or the subject.
In a shaded area, the mode may force an increase in ISO or reduce the speed. Digital noise becomes more visible, and the photo may lack sharpness.
Finally, if an element moves within the frame (an animal, a person, a tree in the wind), landscape mode will not be able to adapt. It treats the entire image as a static scene.
In these situations, taking control of the settings becomes a real added value.
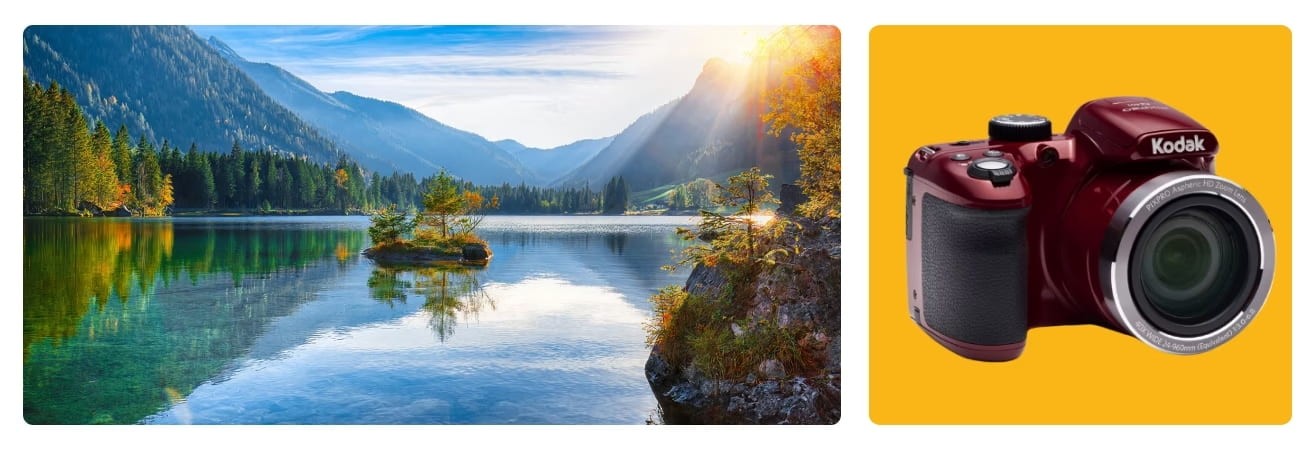
The Kodak PixPro AZ425, for full control over your photos
To go beyond automatic settings, a bridge camera such as the Kodak PixPro AZ425 is an excellent compromise. It remains affordable, but offers more freedom than a compact camera.
Its 42x optical zoom allows you to photograph distant landscapes without any loss of quality. It's perfect for hiking, travelling or taking panoramic shots.
But above all, it gives you access to manual settings: exposure control, white balance, and even focus. This allows you to adapt to lighting conditions, play with contrasts, and make more personal choices.
It's a good way to learn how to better manage your images without immediately upgrading to a more complex SLR.
Learning to compose a real landscape photo
Even with the right mode or settings, a photo will only be successful if it is well constructed. Technique is important, but it is the composition that gives meaning to the image. And this is precisely where landscape mode, as useful as it is, cannot do everything for you.
Rule of thirds, leading lines, balance of masses: the basics of composition
A good landscape photo is often based on a few simple principles. The best known is the rule of thirds. Imagine the image divided into nine equal areas, and place the key elements on the lines or their intersections. This creates a more balanced image that is more pleasing to the eye.
Leading lines also play an important role. A path, a river or a fence can guide the eye towards the main subject. The eye naturally follows these elements, giving movement and depth to the photo.
Finally, consider the balance of masses. If a visually strong element is on one side of the image, it is best to counterbalance it with another detail, light, or a well-placed empty space.
Tips for structuring your image, even with a camera in auto mode
This framing work can be done with any camera. Even in automatic mode, you can choose how to frame, where to position yourself, and when to shoot.
Take the time to observe the scene before taking the photo. Move around slightly, change your height, wait for the light to change. Often, these small adjustments are enough to transform a flat image into an expressive photo.
Whether you're facing the sea and sky, in a forest with a path running through it, or in front of a city with a well-placed silhouette, the strength of the composition depends on your eye, not on an automatic setting.
Mastering landscape photography: finding the right balance
The goal is not to reject automatic settings. Modes such as ‘landscape’ can be useful, especially when you're just starting out or when you need to work quickly. But understanding them better gives you more freedom. You can then use them as a starting point, without limiting yourself to them.
Use landscape mode as a starting point for your photos
Landscape mode is useful in certain conditions. If the light is even and the scene is still and well lit, it allows you to capture a sharp, balanced image without having to worry about settings.
This is handy for photos taken on the spur of the moment. A mountain panorama, a city seen from afar, or a field at sunset. It can also serve as a basis before trying other settings with more control.
It's this flexibility that helps you progress! The key to learning is not to delegate everything to the camera, but to learn how to intervene at the right moment.
Learning how to adjust your photos: ISO, exposure, white balance, manual focus
Once you've taken your first photo in automatic mode, there's nothing stopping you from taking control. Adjusting the ISO sensitivity, for example, allows you to better manage changing light conditions. Changing the exposure can enhance contrast or prevent the sky from being too bright.
The white balance helps to correct colour casts (too blue, too yellow). As for focus, switching to manual focus can be useful if you want to highlight a specific detail in the foreground.
These simple adjustments can transform an okay photo into a truly masterful image.
Film cameras as a school for the eye
For those who want to take their learning even further, film cameras offer a very formative experience. The Kodak i60, a 35 mm camera, forces you to slow down.
There is no screen to check the photo. Every shot counts. You observe more, compose carefully, and anticipate. This slower approach develops a different relationship with the image.
It's a way to get back to basics: light, framing, and timing. And to better understand what it means to ‘make a photo’ rather than ‘take a photo’.
Shoot in landscape mode, but consciously
Landscape mode is a useful tool. It makes photography more accessible, especially for beginners or those who want to capture a scene quickly. But like all automatic modes, it has its limitations.
Understanding what it does allows you to use it better. Knowing when to step away from it opens up new possibilities. That's where the learning really begins.
By exploring other settings, working on your composition, or taking the time to observe, you learn to construct your images with more intention.
Whether it's a lightweight compact camera, a more comprehensive bridge camera, or even a film camera, each tool becomes a partner in your vision. And it's that vision, more than the mode you choose, that makes all the difference.